> ## Documentation Index
> Fetch the complete documentation index at: https://docs.monterey.ai/llms.txt
> Use this file to discover all available pages before exploring further.
# Zendesk
> Ingest Zendesk Tickets
export const provider_0 = "Zendesk"
export const customFieldSelectionStrategy_0 = undefined
export const customFilteringStrategy_0 = "Use filters to focus on active or recent tickets - Filter by status to exclude closed tickets if analyzing ongoing issues - Use organization or user filters to focus on specific customer segments - Combine multiple filters to create precise data subsets"
export const customPerformanceConsiderations_0 = undefined
 ### Overview
Zendesk empowers businesses to build better customer relationships through its service platform. By connecting Reforge Insights with Zendesk, you can go deeper, getting the insights your teams need to provide better service, support, and product.
### Get Started
You can find the Zendesk integration on your **[integration settings page](https://insights.reforge.com/w/default/settings/integrations/zendesk)**.
A user with access to both Reforge Insights as well as Zendesk will need to authorize the connection.
## Advanced Configuration
### Overview
Zendesk empowers businesses to build better customer relationships through its service platform. By connecting Reforge Insights with Zendesk, you can go deeper, getting the insights your teams need to provide better service, support, and product.
### Get Started
You can find the Zendesk integration on your **[integration settings page](https://insights.reforge.com/w/default/settings/integrations/zendesk)**.
A user with access to both Reforge Insights as well as Zendesk will need to authorize the connection.
## Advanced Configuration
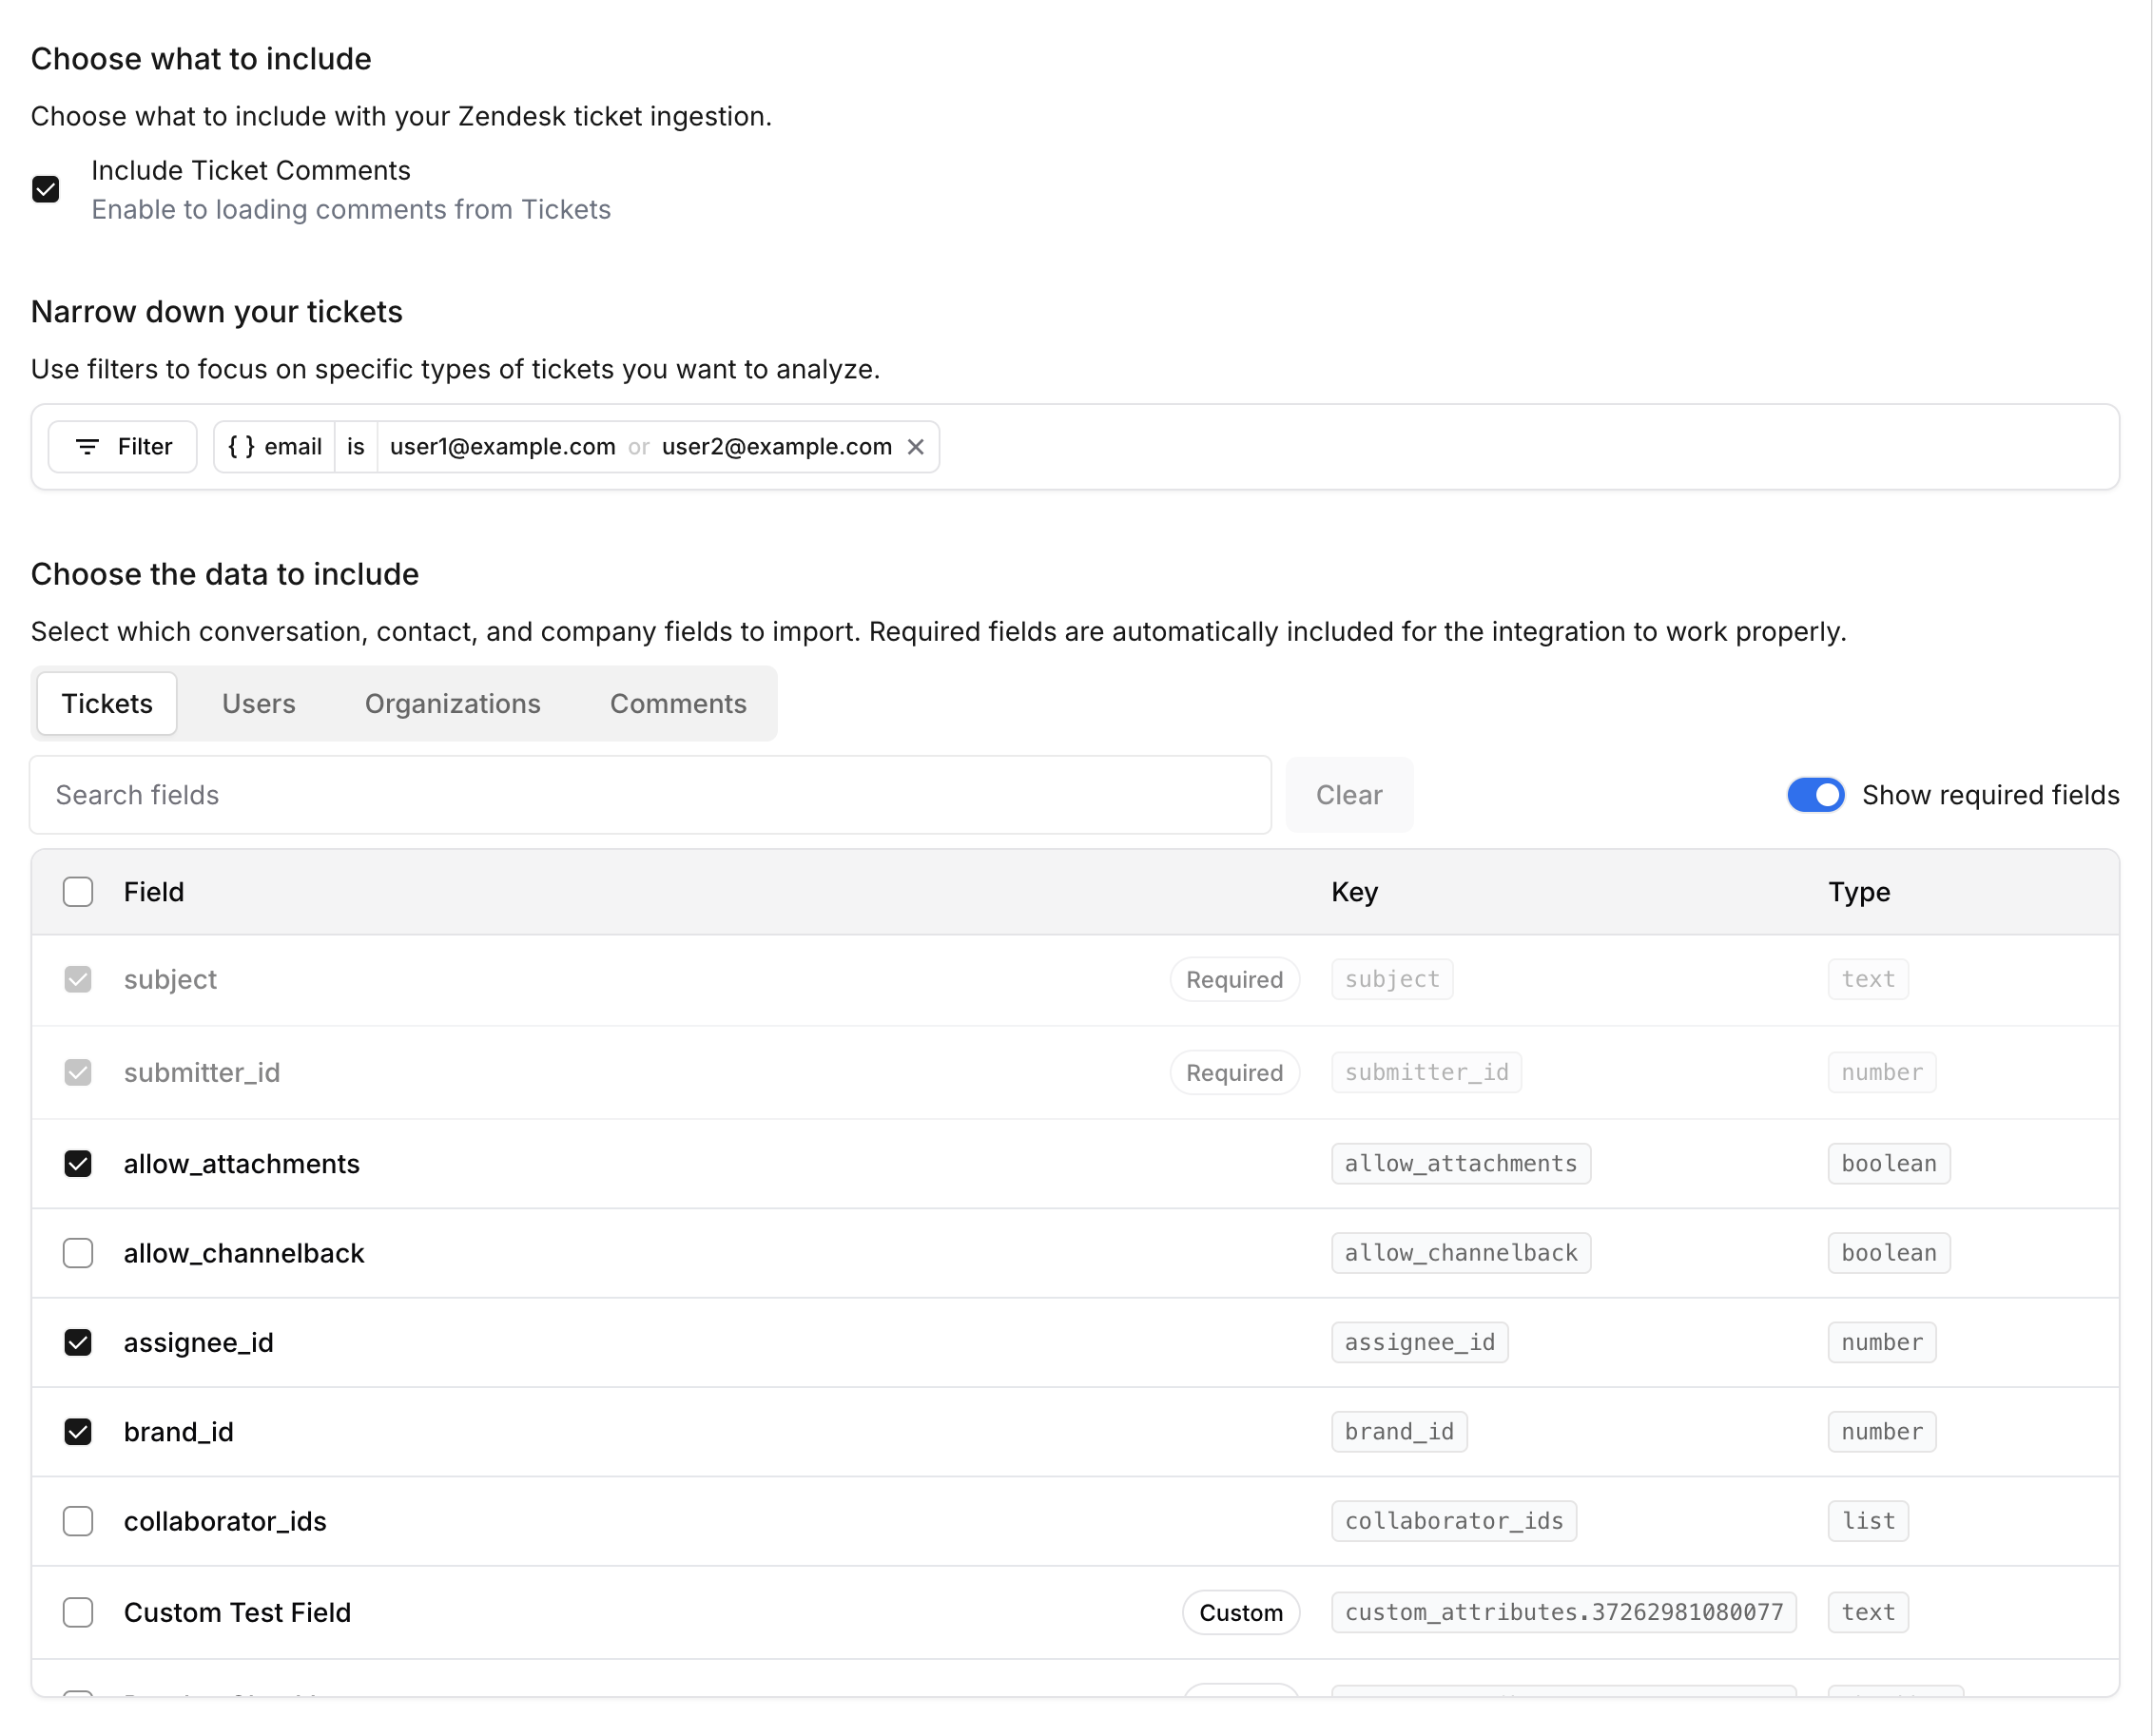 After connecting your Zendesk account, you can customize exactly what data gets imported and how it's filtered. The Zendesk integration allows you to import tickets, comments, users, and organizations from your Zendesk instance with precise control over field selection and filtering criteria.
### Configuration Sections
#### 1. Choose What to Include
##### **Include Ticket Comments**
Enable this option to import comments associated with tickets in addition to the ticket content itself.
Including ticket comments will increase the amount of data imported and may
affect ingestion performance for large Zendesk instances.
#### 2. Narrow Down Your Tickets
Use filters to focus on specific types of tickets you want to analyze. This helps you import only the data that's relevant to your use case.
All filtering is based on ticket data. While you can filter using related
user, organization, or comment fields, the filtering always applies to which
tickets get imported.
##### Filter Types and Operators
Different field types support different filtering operators:
**Available Operators:**
* `contains` - Field contains the specified text
* `does not contain` - Field does not contain the specified text
**Examples:**
* Subject contains "billing"
* Description does not contain "resolved"
**Available Operators:**
* `is` - Field equals the specified number
* `is not` - Field does not equal the specified number
* `is greater than` - Field is greater than the specified number
* `is less than` - Field is less than the specified number
* `is less than or equal to` - Field is less than or equal to the specified number
* `is greater than or equal to` - Field is greater than or equal to the specified number
* `is empty` - Field is empty
* `is not empty` - Field is not empty
* `between` - Field falls within the specified range
**Examples:**
* Priority equals 3
* Satisfaction score is greater than 4
**Available Operators:**
* `between` - Field falls within the specified date range
* `is empty` - Field is empty
* `is not empty` - Field is not empty
**Examples:**
* Updated date range between 2024-01-01 and 2024-02-01
* Created date is empty
**Available Operators:**
* `is` - Field is any of the specified values
* `is not` - Field is not any of the specified values
* `is empty` - Field is empty
* `is not empty` - Field is not empty
**Examples:**
* Tags is "urgent" or "billing"
* Status is not "closed" or "solved"
**Available Operators:**
* `is` - Field matches the specified boolean value (true/false)
* `is not` - Field does not match the specified boolean value
* `is empty` - Field is empty
* `is not empty` - Field is not empty
**Examples:**
* Is public is true
* Has incidents is false
##### Multiple Filters
When you add multiple filters, they are combined using an **AND** operator. This means tickets must match ALL filter criteria to be imported.
Start with broader filters and gradually add more specific ones to fine-tune
your data selection.
#### 3. Choose the Data to Include
Select which conversation, contact, and company fields to import. The data is organized into tabs representing different data types that can be ingested.
##### Data Type Tabs
Core ticket information including subject, description, status, priority, and custom ticket fields.
Information about ticket requesters, assignees, and other users including
contact details and custom user fields.
Company information associated with users and tickets, including custom
organization fields.
Ticket comments and their associated metadata (only visible when "Include Ticket Comments" is enabled).
##### Field Selection
Fields marked as **Required** are essential for the integration to function properly and cannot be deselected. These fields include:
* **Tickets**: `id`, `created_at`, `updated_at`, `organization_id`, `requester_id`, `submitter_id`, `subject`, `description`
* **Users**: `id`, `created_at`, `updated_at`, `name`, `email`
* **Organizations**: `id`, `domain_names`, `name`, `details`, `created_at`, `updated_at`
* **Comments**: `id`, `author_id`, `body`, `created_at`, `type`
Required fields are automatically included in the ingestion process regardless
of selection status.
**Preselected Fields**: Beyond the required fields, we automatically preselect additional commonly used fields to help you get started quickly with meaningful data. These preselected fields include useful metadata like ticket types, assignee information, status details, and satisfaction ratings that are frequently needed for analysis. You can deselect any of these preselected fields if they're not relevant to your specific use case.
Standard Zendesk fields that are available across all instances. These include common fields like:
* Priority levels
* Status values
* Assignee information
* Satisfaction ratings
* Tags
Select the fields that are relevant to your analysis and reporting needs.
Custom fields created in your Zendesk instance are automatically detected and available for selection. These fields:
* Are fetched directly from your Zendesk configuration
* Include the custom field name and description
* Support all standard filtering and selection options
* Are stored with their original field names in the metadata
Custom fields are dynamically loaded from your Zendesk instance, so any changes to custom fields in Zendesk will be reflected in the integration.
### Best Practices
{customFieldSelectionStrategy_0 ||
`Start with required fields and commonly used standard fields - Add custom
fields that are consistently populated and relevant to your analysis -
Consider the impact on data volume when selecting many fields - Review and
update field selections as your {provider} usage evolves`}
{customFilteringStrategy_0 ||
`Use filters to focus on the most relevant data for your use case - Apply
filters to narrow down to specific statuses, categories, or priorities -
Remember that only records with content will be ingested regardless of filters`}
{customPerformanceConsiderations_0 ||
`More fields and fewer filters = larger data volume - Consider the frequency
of your data sync when selecting options - Monitor ingestion performance and
adjust as needed`}
### Next Steps
After configuring your {provider_0} integration:
1. **Test the configuration** by triggering a manual sync
2. **Monitor the ingestion** to ensure data is being imported correctly
3. **Review the imported data** in your analytics dashboard
4. **Adjust filters and fields** based on your initial results
5. **Set up automated workflows** using the imported HubSpot data
Changes to field selection and filters will apply to future data ingestion.
Existing imported data will not be retroactively updated.
### Data Collected
Once Reforge Insights and Zendesk are connected successfully, data will be pulled from periodically. The first time Reforge Insights loads data, it will look back 1 week. After that, it will ingest all new data up to your plan's feedback volume limit.
Each ticket that is accessible will be ingested, such that the ticket and, if enabled, associated comments are analyzed and visible in Reforge Insights.
### Pricing Volume Impact
| Entity Type | Volume Impact |
| :---------- | :-----------: |
| Ticket | **1x** |
View the [pricing page](/pricing/volume-calculation) for more information on
how we calculate volume usage.
After connecting your Zendesk account, you can customize exactly what data gets imported and how it's filtered. The Zendesk integration allows you to import tickets, comments, users, and organizations from your Zendesk instance with precise control over field selection and filtering criteria.
### Configuration Sections
#### 1. Choose What to Include
##### **Include Ticket Comments**
Enable this option to import comments associated with tickets in addition to the ticket content itself.
Including ticket comments will increase the amount of data imported and may
affect ingestion performance for large Zendesk instances.
#### 2. Narrow Down Your Tickets
Use filters to focus on specific types of tickets you want to analyze. This helps you import only the data that's relevant to your use case.
All filtering is based on ticket data. While you can filter using related
user, organization, or comment fields, the filtering always applies to which
tickets get imported.
##### Filter Types and Operators
Different field types support different filtering operators:
**Available Operators:**
* `contains` - Field contains the specified text
* `does not contain` - Field does not contain the specified text
**Examples:**
* Subject contains "billing"
* Description does not contain "resolved"
**Available Operators:**
* `is` - Field equals the specified number
* `is not` - Field does not equal the specified number
* `is greater than` - Field is greater than the specified number
* `is less than` - Field is less than the specified number
* `is less than or equal to` - Field is less than or equal to the specified number
* `is greater than or equal to` - Field is greater than or equal to the specified number
* `is empty` - Field is empty
* `is not empty` - Field is not empty
* `between` - Field falls within the specified range
**Examples:**
* Priority equals 3
* Satisfaction score is greater than 4
**Available Operators:**
* `between` - Field falls within the specified date range
* `is empty` - Field is empty
* `is not empty` - Field is not empty
**Examples:**
* Updated date range between 2024-01-01 and 2024-02-01
* Created date is empty
**Available Operators:**
* `is` - Field is any of the specified values
* `is not` - Field is not any of the specified values
* `is empty` - Field is empty
* `is not empty` - Field is not empty
**Examples:**
* Tags is "urgent" or "billing"
* Status is not "closed" or "solved"
**Available Operators:**
* `is` - Field matches the specified boolean value (true/false)
* `is not` - Field does not match the specified boolean value
* `is empty` - Field is empty
* `is not empty` - Field is not empty
**Examples:**
* Is public is true
* Has incidents is false
##### Multiple Filters
When you add multiple filters, they are combined using an **AND** operator. This means tickets must match ALL filter criteria to be imported.
Start with broader filters and gradually add more specific ones to fine-tune
your data selection.
#### 3. Choose the Data to Include
Select which conversation, contact, and company fields to import. The data is organized into tabs representing different data types that can be ingested.
##### Data Type Tabs
Core ticket information including subject, description, status, priority, and custom ticket fields.
Information about ticket requesters, assignees, and other users including
contact details and custom user fields.
Company information associated with users and tickets, including custom
organization fields.
Ticket comments and their associated metadata (only visible when "Include Ticket Comments" is enabled).
##### Field Selection
Fields marked as **Required** are essential for the integration to function properly and cannot be deselected. These fields include:
* **Tickets**: `id`, `created_at`, `updated_at`, `organization_id`, `requester_id`, `submitter_id`, `subject`, `description`
* **Users**: `id`, `created_at`, `updated_at`, `name`, `email`
* **Organizations**: `id`, `domain_names`, `name`, `details`, `created_at`, `updated_at`
* **Comments**: `id`, `author_id`, `body`, `created_at`, `type`
Required fields are automatically included in the ingestion process regardless
of selection status.
**Preselected Fields**: Beyond the required fields, we automatically preselect additional commonly used fields to help you get started quickly with meaningful data. These preselected fields include useful metadata like ticket types, assignee information, status details, and satisfaction ratings that are frequently needed for analysis. You can deselect any of these preselected fields if they're not relevant to your specific use case.
Standard Zendesk fields that are available across all instances. These include common fields like:
* Priority levels
* Status values
* Assignee information
* Satisfaction ratings
* Tags
Select the fields that are relevant to your analysis and reporting needs.
Custom fields created in your Zendesk instance are automatically detected and available for selection. These fields:
* Are fetched directly from your Zendesk configuration
* Include the custom field name and description
* Support all standard filtering and selection options
* Are stored with their original field names in the metadata
Custom fields are dynamically loaded from your Zendesk instance, so any changes to custom fields in Zendesk will be reflected in the integration.
### Best Practices
{customFieldSelectionStrategy_0 ||
`Start with required fields and commonly used standard fields - Add custom
fields that are consistently populated and relevant to your analysis -
Consider the impact on data volume when selecting many fields - Review and
update field selections as your {provider} usage evolves`}
{customFilteringStrategy_0 ||
`Use filters to focus on the most relevant data for your use case - Apply
filters to narrow down to specific statuses, categories, or priorities -
Remember that only records with content will be ingested regardless of filters`}
{customPerformanceConsiderations_0 ||
`More fields and fewer filters = larger data volume - Consider the frequency
of your data sync when selecting options - Monitor ingestion performance and
adjust as needed`}
### Next Steps
After configuring your {provider_0} integration:
1. **Test the configuration** by triggering a manual sync
2. **Monitor the ingestion** to ensure data is being imported correctly
3. **Review the imported data** in your analytics dashboard
4. **Adjust filters and fields** based on your initial results
5. **Set up automated workflows** using the imported HubSpot data
Changes to field selection and filters will apply to future data ingestion.
Existing imported data will not be retroactively updated.
### Data Collected
Once Reforge Insights and Zendesk are connected successfully, data will be pulled from periodically. The first time Reforge Insights loads data, it will look back 1 week. After that, it will ingest all new data up to your plan's feedback volume limit.
Each ticket that is accessible will be ingested, such that the ticket and, if enabled, associated comments are analyzed and visible in Reforge Insights.
### Pricing Volume Impact
| Entity Type | Volume Impact |
| :---------- | :-----------: |
| Ticket | **1x** |
View the [pricing page](/pricing/volume-calculation) for more information on
how we calculate volume usage.